实验的效果
本实验用ESP32发送模拟温度给Thingsboard,Thingsboard接受到温度后进行判断,如果温度大于30度,则返回一个指令给ESP32,ESP获得指令后,点亮板载LED等。
实验所需
Arduino 软件
ESP32 板卡
thingsboard平台,使用本站的io.huakaka.com
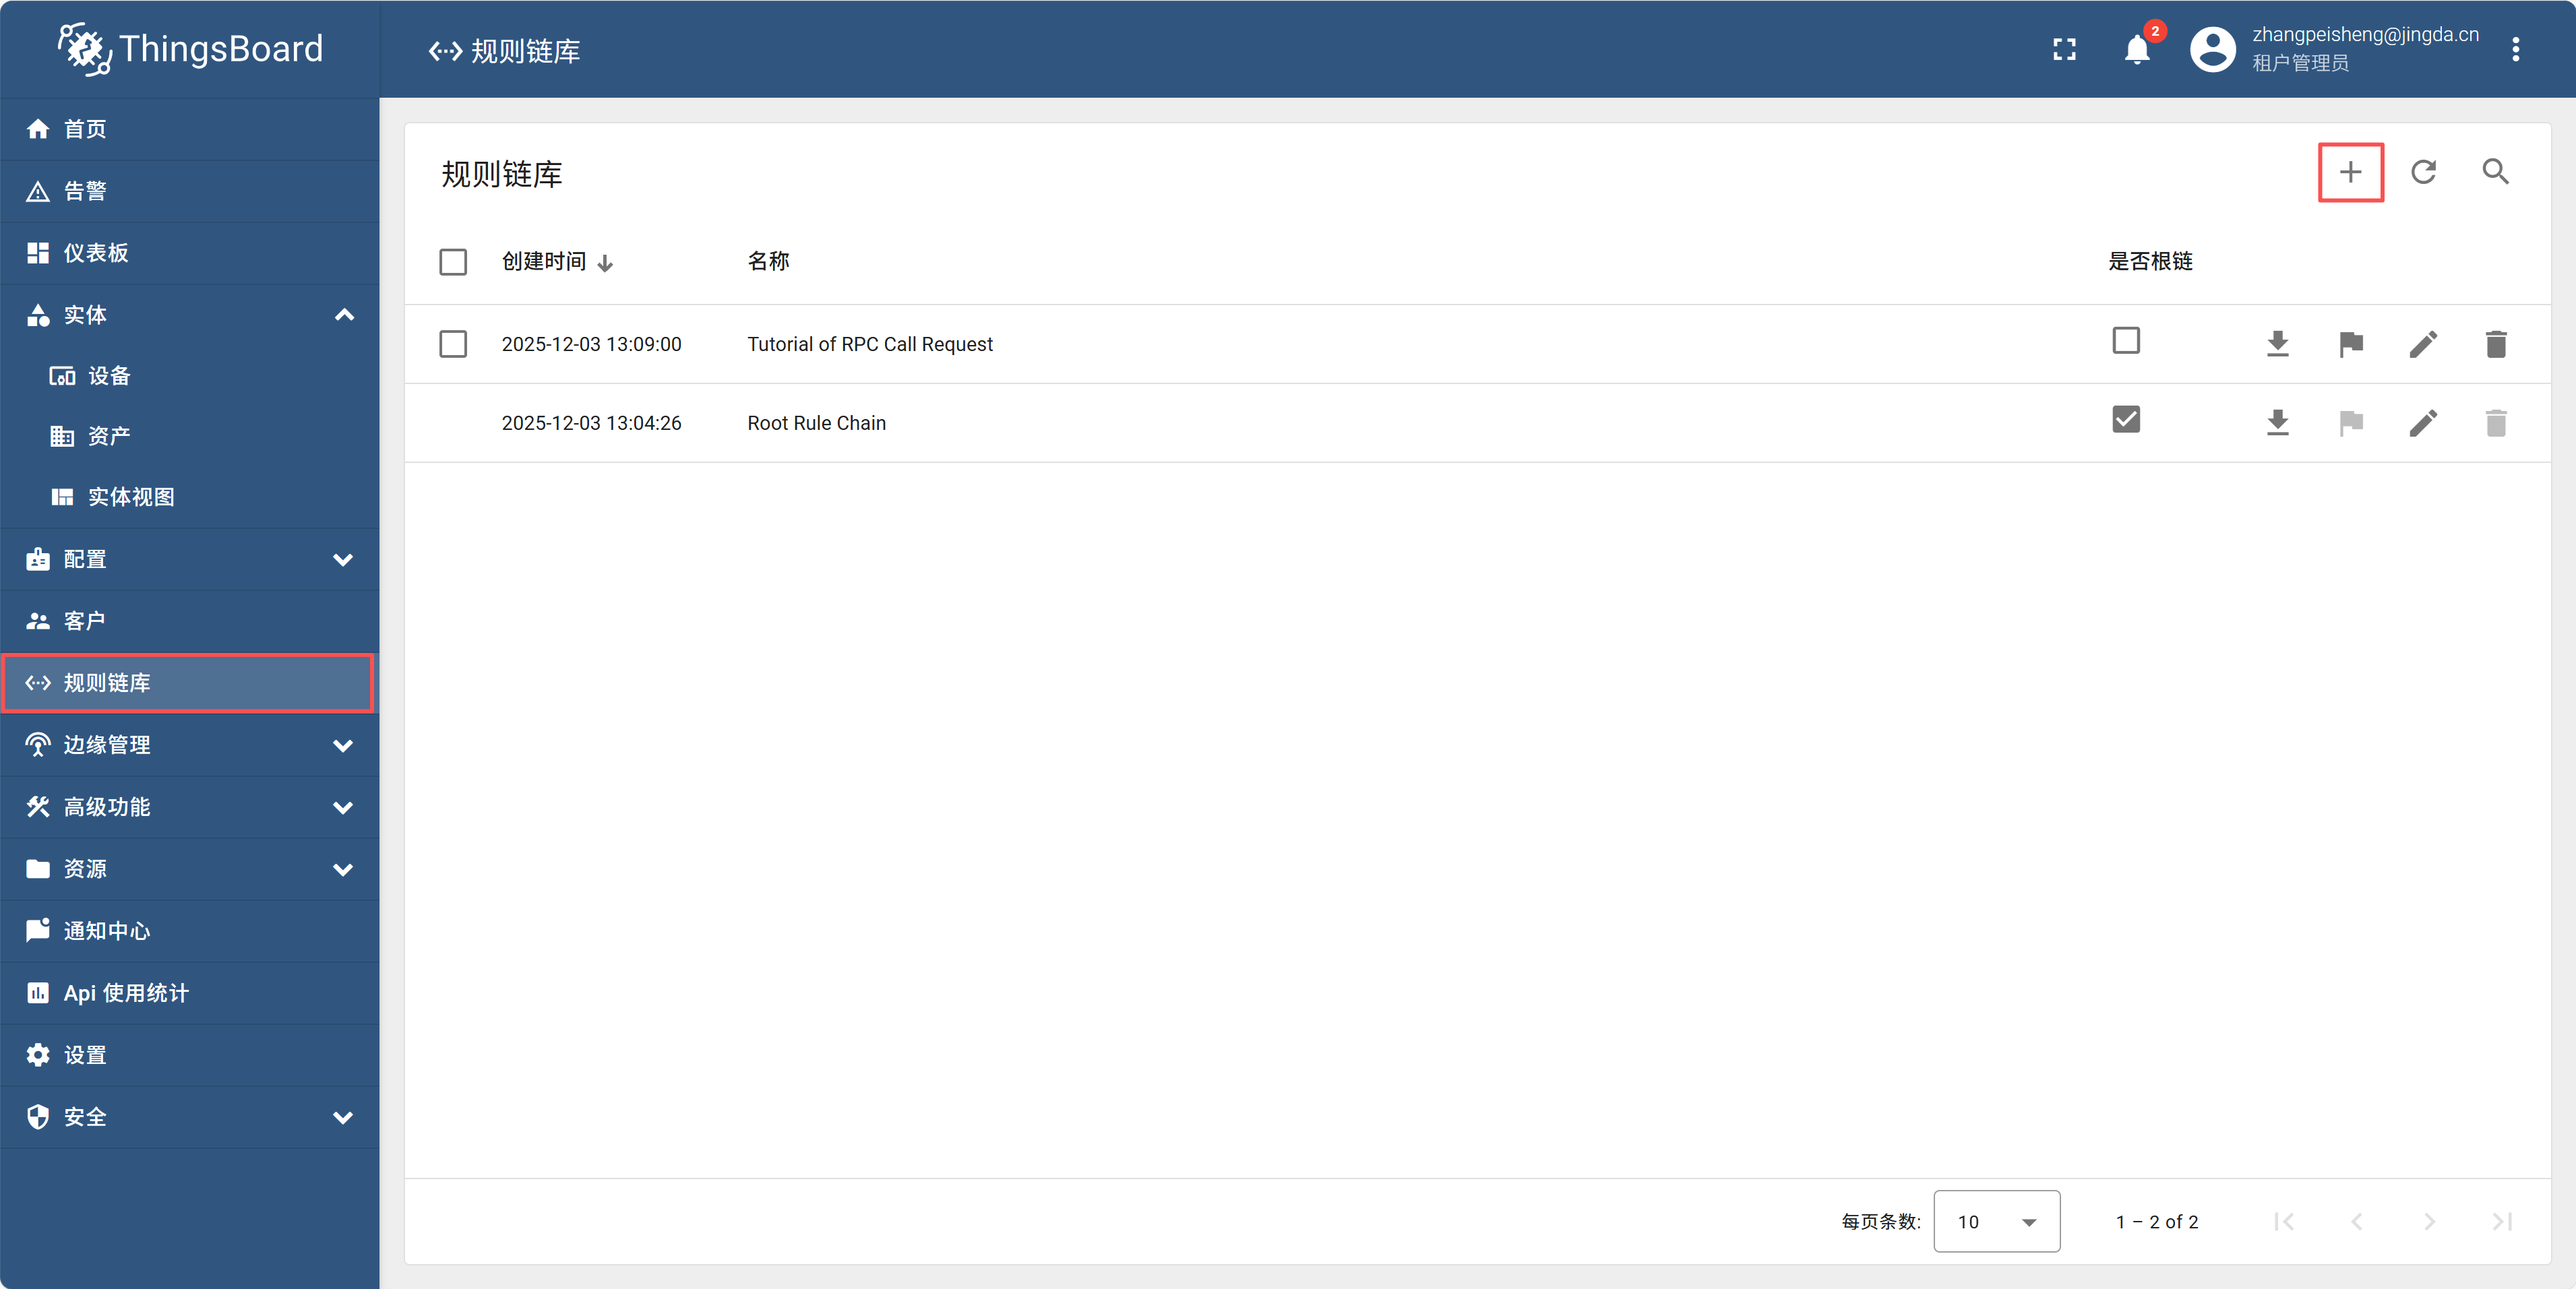
规则链库的Json文件。tutorial_of_rpc_call_request.json
实验步骤
登录io.huakak.com
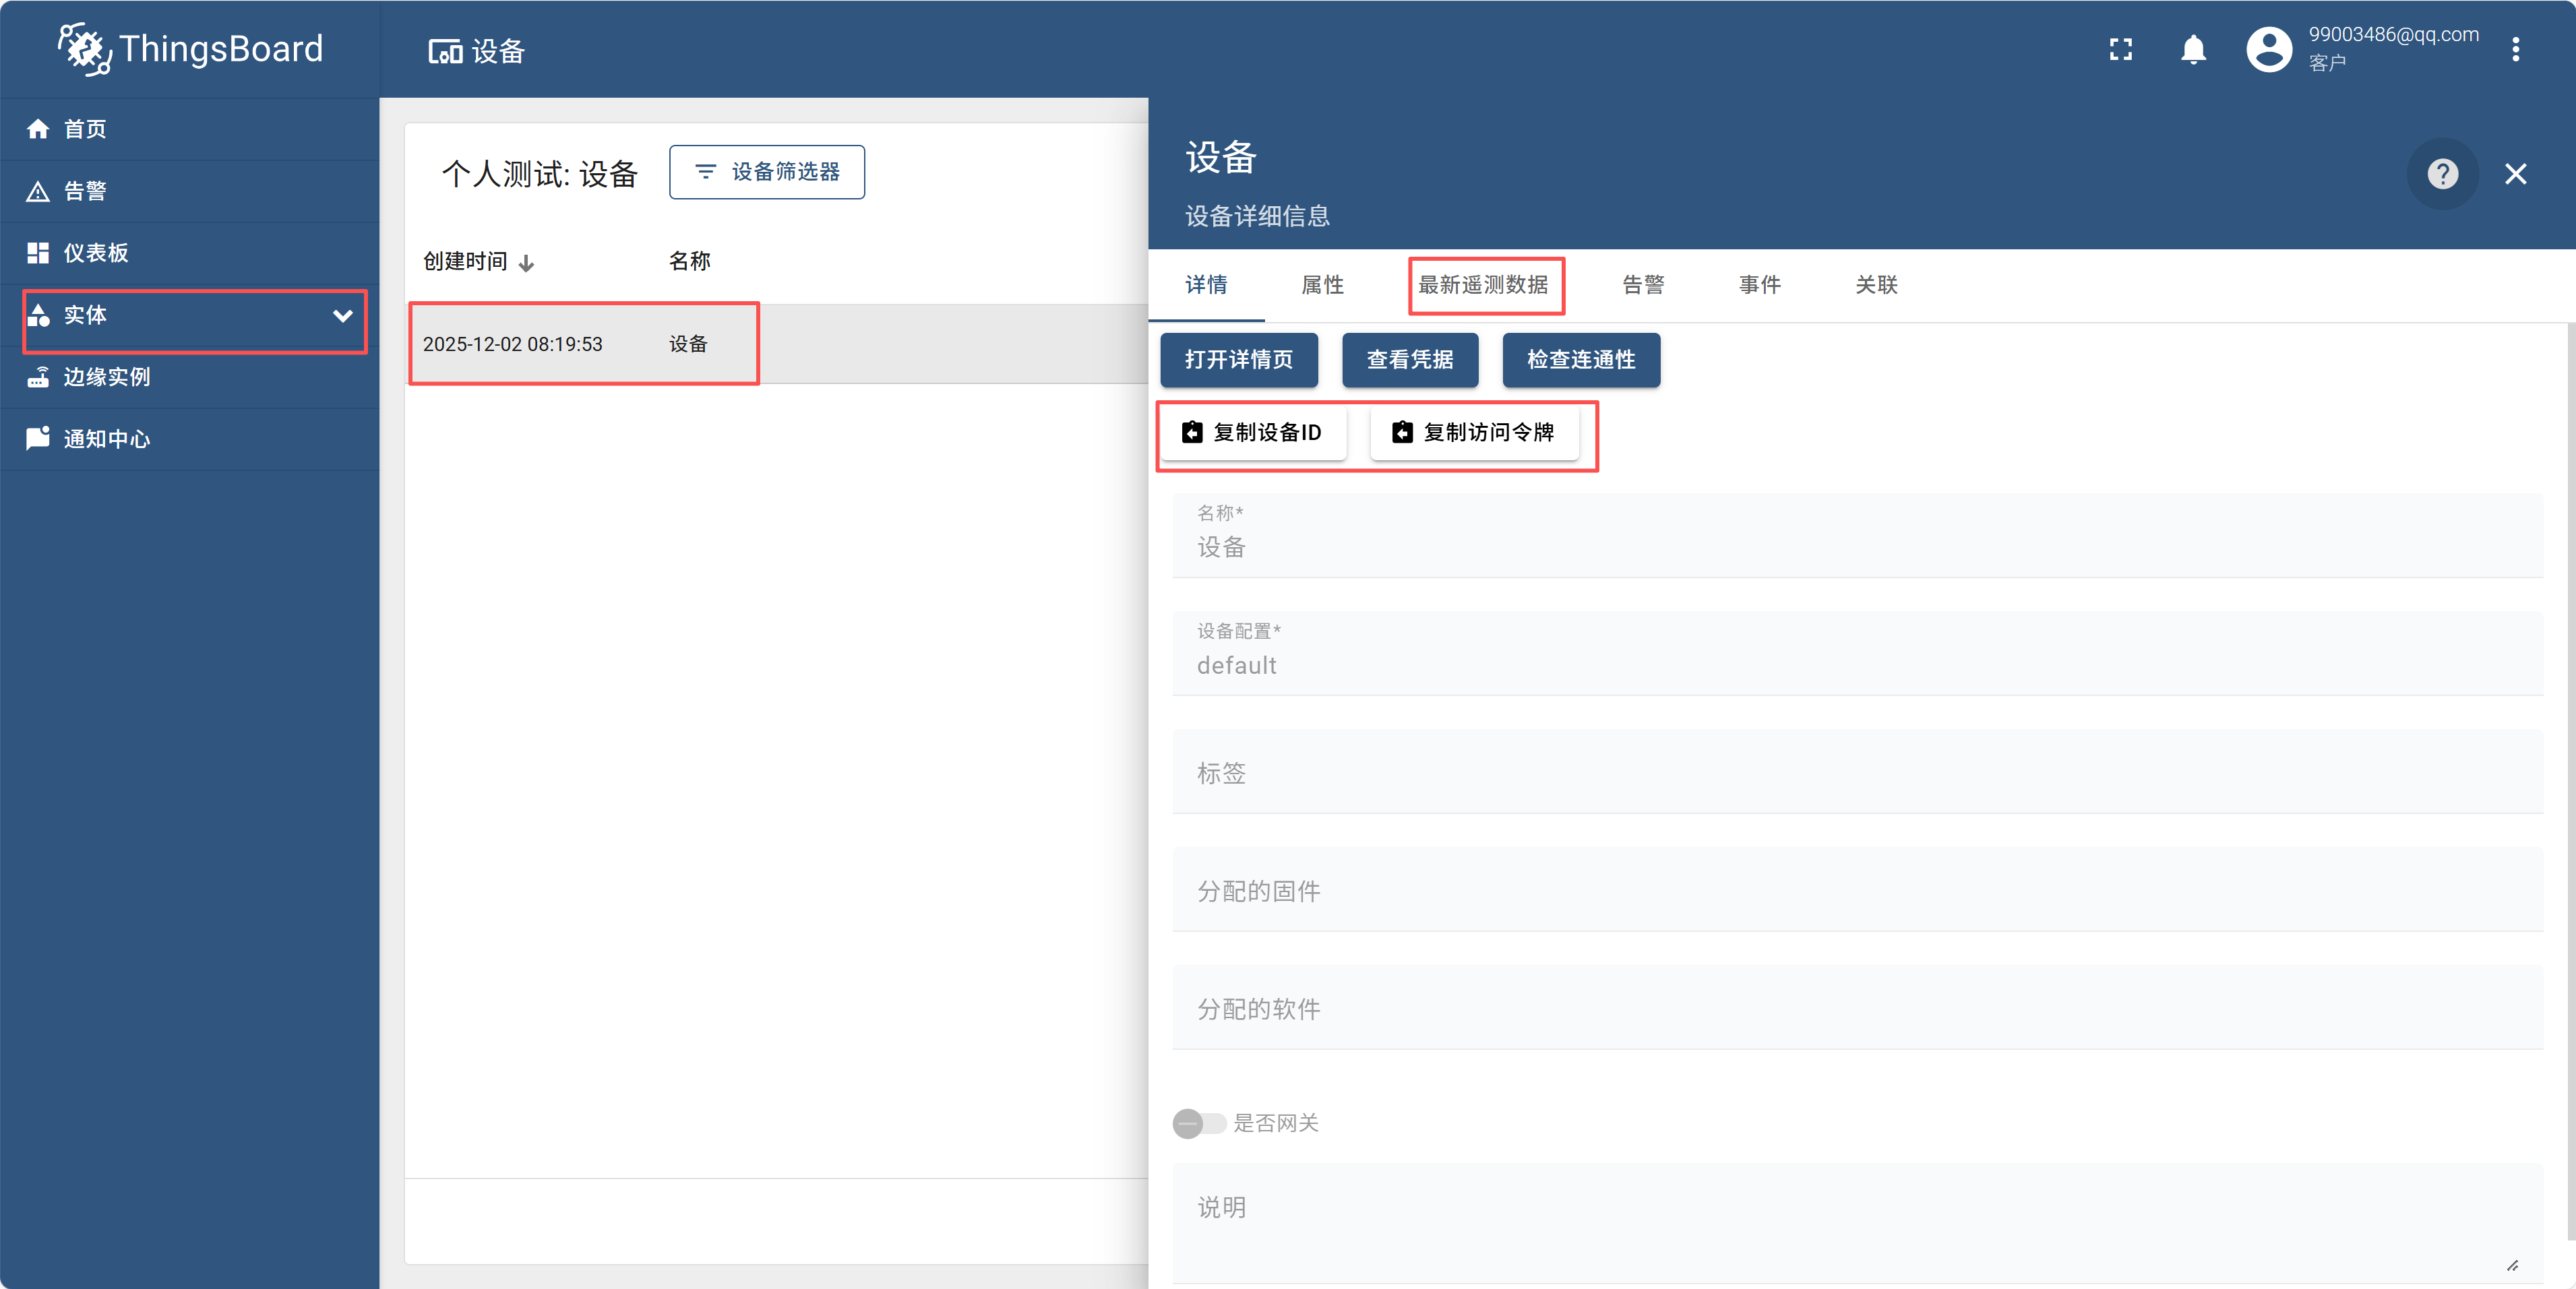
点击左侧实体->设备标签,复制访问令牌,备用
 3. 在Arduino里面,连接到ESP板卡,写入下面的代码,修改wifi信息,复制访问令牌,并粘贴到DEVICE_TOKEN处。编译运行。
Arduino代码
    ///LED根据产生的温度点亮或者熄灭,》=35度则点亮,否则熄灭
#include <WiFi.h>
#include <PubSubClient.h>
#include <ArduinoJson.h>

// 基础配置(替换为你的信息)
const char* WIFI_SSID = "wifi名称在这里";
const char* WIFI_PWD = "WiFi密码在这里";
const char* TB_IP = "47.98.193.197";
const uint16_t TB_PORT = 1883;//1883
const char* DEVICE_TOKEN = "uhiAgXTbAURp8lfXbzYi"//输入设备访问令牌;

// 硬件定义
const int LED_PIN = 2; // ESP32板载LED
WiFiClient espClient;
PubSubClient client(espClient);

// 全局变量:存储当前随机温度
float currentTemp;

// WiFi连接(带详细打印)
void connectWiFi() {
  Serial.print("正在连接WiFi: ");
  Serial.println(WIFI_SSID);

  WiFi.begin(WIFI_SSID, WIFI_PWD);
  while (WiFi.status() != WL_CONNECTED) {
    delay(500);
    Serial.print(".");
  }

  Serial.println("\nWiFi连接成功!");
  Serial.print("ESP32 IP地址: ");
  Serial.println(WiFi.localIP()); // 打印ESP32的IP端口相关信息
  Serial.print("MQTT服务器地址: ");
  Serial.print(TB_IP);
  Serial.print(":");
  Serial.println(TB_PORT); // 打印ThingsBoard MQTT端口
}

// MQTT重连+订阅RPC主题(带详细打印)
void reconnectMQTT() {
  while (!client.connected()) {
    Serial.print("尝试连接MQTT服务器: ");
    Serial.print(TB_IP);
    Serial.print(":");
    Serial.println(TB_PORT);

    // 连接MQTT:客户端ID=ESP32,用户名=设备令牌,密码空
    if (client.connect("ESP32-RPC-Client", DEVICE_TOKEN, "")) {
      Serial.println("MQTT连接成功!");
      // 订阅RPC请求主题(核心)
      client.subscribe("v1/devices/me/rpc/request/+");
      Serial.println("已订阅RPC主题: v1/devices/me/rpc/request/+");
    } else {
      Serial.print("MQTT连接失败,错误码: ");
      Serial.println(client.state());
      Serial.println("5秒后重试...");
      delay(5000);
    }
  }
}

// 生成30~37℃的随机温度(保留1位小数)
float generateRandomTemp() {
  // 初始化随机数种子(基于系统运行时间,避免重复)
  randomSeed(millis());
  // 生成300~370的整数 → 除以10得到30.0~37.0的浮点数
  int tempInt = random(300, 371);
  return (float)tempInt / 10.0;
}

// 根据温度控制LED(>35℃亮,≤35℃灭)
void controlLedByTemp(float temp) {
  if (temp > 35.0) {
    digitalWrite(LED_PIN, HIGH);
    Serial.printf("当前温度: %.1f℃ > 35℃ → LED点亮\n", temp);
  } else {
    digitalWrite(LED_PIN, LOW);
    Serial.printf("当前温度: %.1f℃ ≤ 35℃ → LED熄灭\n", temp);
  }
}

// RPC回调(核心:解析指令+返回响应,带完整打印)
void onRpcReceived(char* topic, byte* payload, unsigned int len) {
  Serial.println("\n=====================");
  Serial.println("收到RPC请求:");

  // 打印请求主题
  Serial.print("请求主题: ");
  Serial.println(topic);

  // 打印请求内容
  Serial.print("请求内容: ");
  for (int i = 0; i < len; i++) {
    Serial.print((char)payload[i]);
  }
  Serial.println();

  // 提取requestId(用于响应)
  String topicStr = topic;
  int reqIdIndex = topicStr.lastIndexOf('/') + 1;
  String reqId = topicStr.substring(reqIdIndex);
  Serial.print("提取RequestID: ");
  Serial.println(reqId);

  // 解析RPC指令
  JsonDocument doc;
  DeserializationError error = deserializeJson(doc, payload, len);
  if (error) {
    Serial.print("JSON解析失败: ");
    Serial.println(error.c_str());
    // 返回错误响应
    JsonDocument resDoc;
    resDoc["success"] = false;
    resDoc["error"] = "JSON parse failed";
    String resPayload;
    serializeJson(resDoc, resPayload);
    client.publish(("v1/devices/me/rpc/response/" + reqId).c_str(), resPayload.c_str());
    Serial.print("错误响应: ");
    Serial.println(resPayload);
    return;
  }

  // 提取方法和参数
  String method = doc["method"];
  int params = doc["params"];
  Serial.print("RPC方法: ");
  Serial.println(method);
  Serial.print("RPC参数: ");
  Serial.println(params);

  // 处理set_led指令(保留RPC手动控制功能)
  bool success = false;
  String msg = "";
  if (method == "set_led") {
    digitalWrite(LED_PIN, params); // 控制LED
    success = true;
    msg = params ? "LED已开启" : "LED已关闭";
    Serial.println("执行结果: " + msg);
  } else {
    msg = "未知方法: " + method;
    Serial.println("执行结果: " + msg);
  }

  // 构建响应数据(新增当前温度和LED状态)
  JsonDocument resDoc;
  resDoc["success"] = success;
  resDoc["message"] = msg;
  resDoc["current_temperature"] = currentTemp; // 当前随机温度
  resDoc["led_state"] = digitalRead(LED_PIN);   // 当前LED状态
  String resPayload;
  serializeJson(resDoc, resPayload);

  // 发布响应
  String resTopic = "v1/devices/me/rpc/response/" + reqId;
  client.publish(resTopic.c_str(), resPayload.c_str());

  // 打印响应信息
  Serial.print("响应主题: ");
  Serial.println(resTopic);
  Serial.print("响应内容: ");
  Serial.println(resPayload);
  Serial.println("=====================\n");
}

// 上报温度数据(触发规则链,带打印)
void sendTempData() {
  Serial.println("\n---------- 上报遥测数据 ----------");
  // 生成30~37℃的随机温度
  currentTemp = generateRandomTemp();

  // 按温度自动控制LED
  controlLedByTemp(currentTemp);

  // 构建上报数据
  JsonDocument doc;
  doc["temperature"] = currentTemp; // 上报随机温度
  doc["led_state"] = digitalRead(LED_PIN); // 上报当前LED状态
  char payload[64];
  serializeJson(doc, payload);

  Serial.print("上报主题: v1/devices/me/telemetry");
  Serial.print(" | 上报内容: ");
  Serial.println(payload);

  // 发布数据
  bool publishOk = client.publish("v1/devices/me/telemetry", payload);
  if (publishOk) {
    Serial.println("数据上报成功!");
  } else {
    Serial.println("数据上报失败!");
  }
  Serial.println("----------------------------------");
}

void setup() {
  Serial.begin(115200);
  pinMode(LED_PIN, OUTPUT);
  digitalWrite(LED_PIN, LOW); // 初始关闭LED

  Serial.println("======== ESP32启动 ========");
  connectWiFi(); // 连接WiFi(带端口打印)
  client.setServer(TB_IP, TB_PORT); // 设置MQTT服务器地址+端口
  client.setCallback(onRpcReceived); // 绑定RPC回调
}

void loop() {
  // 维持MQTT连接
  if (!client.connected()) {
    reconnectMQTT();
  }
  client.loop();

  // 每5秒上报一次温度数据(并自动控制LED)
  static unsigned long lastSend = 0;
  if (millis() - lastSend > 5000) {
    lastSend = millis();
    sendTempData();
  }
}输入以下代码:
在io.huakaka.com里面,点击规则链库,再点击右上角+号,选择导入下载好的规则链JSON文件。
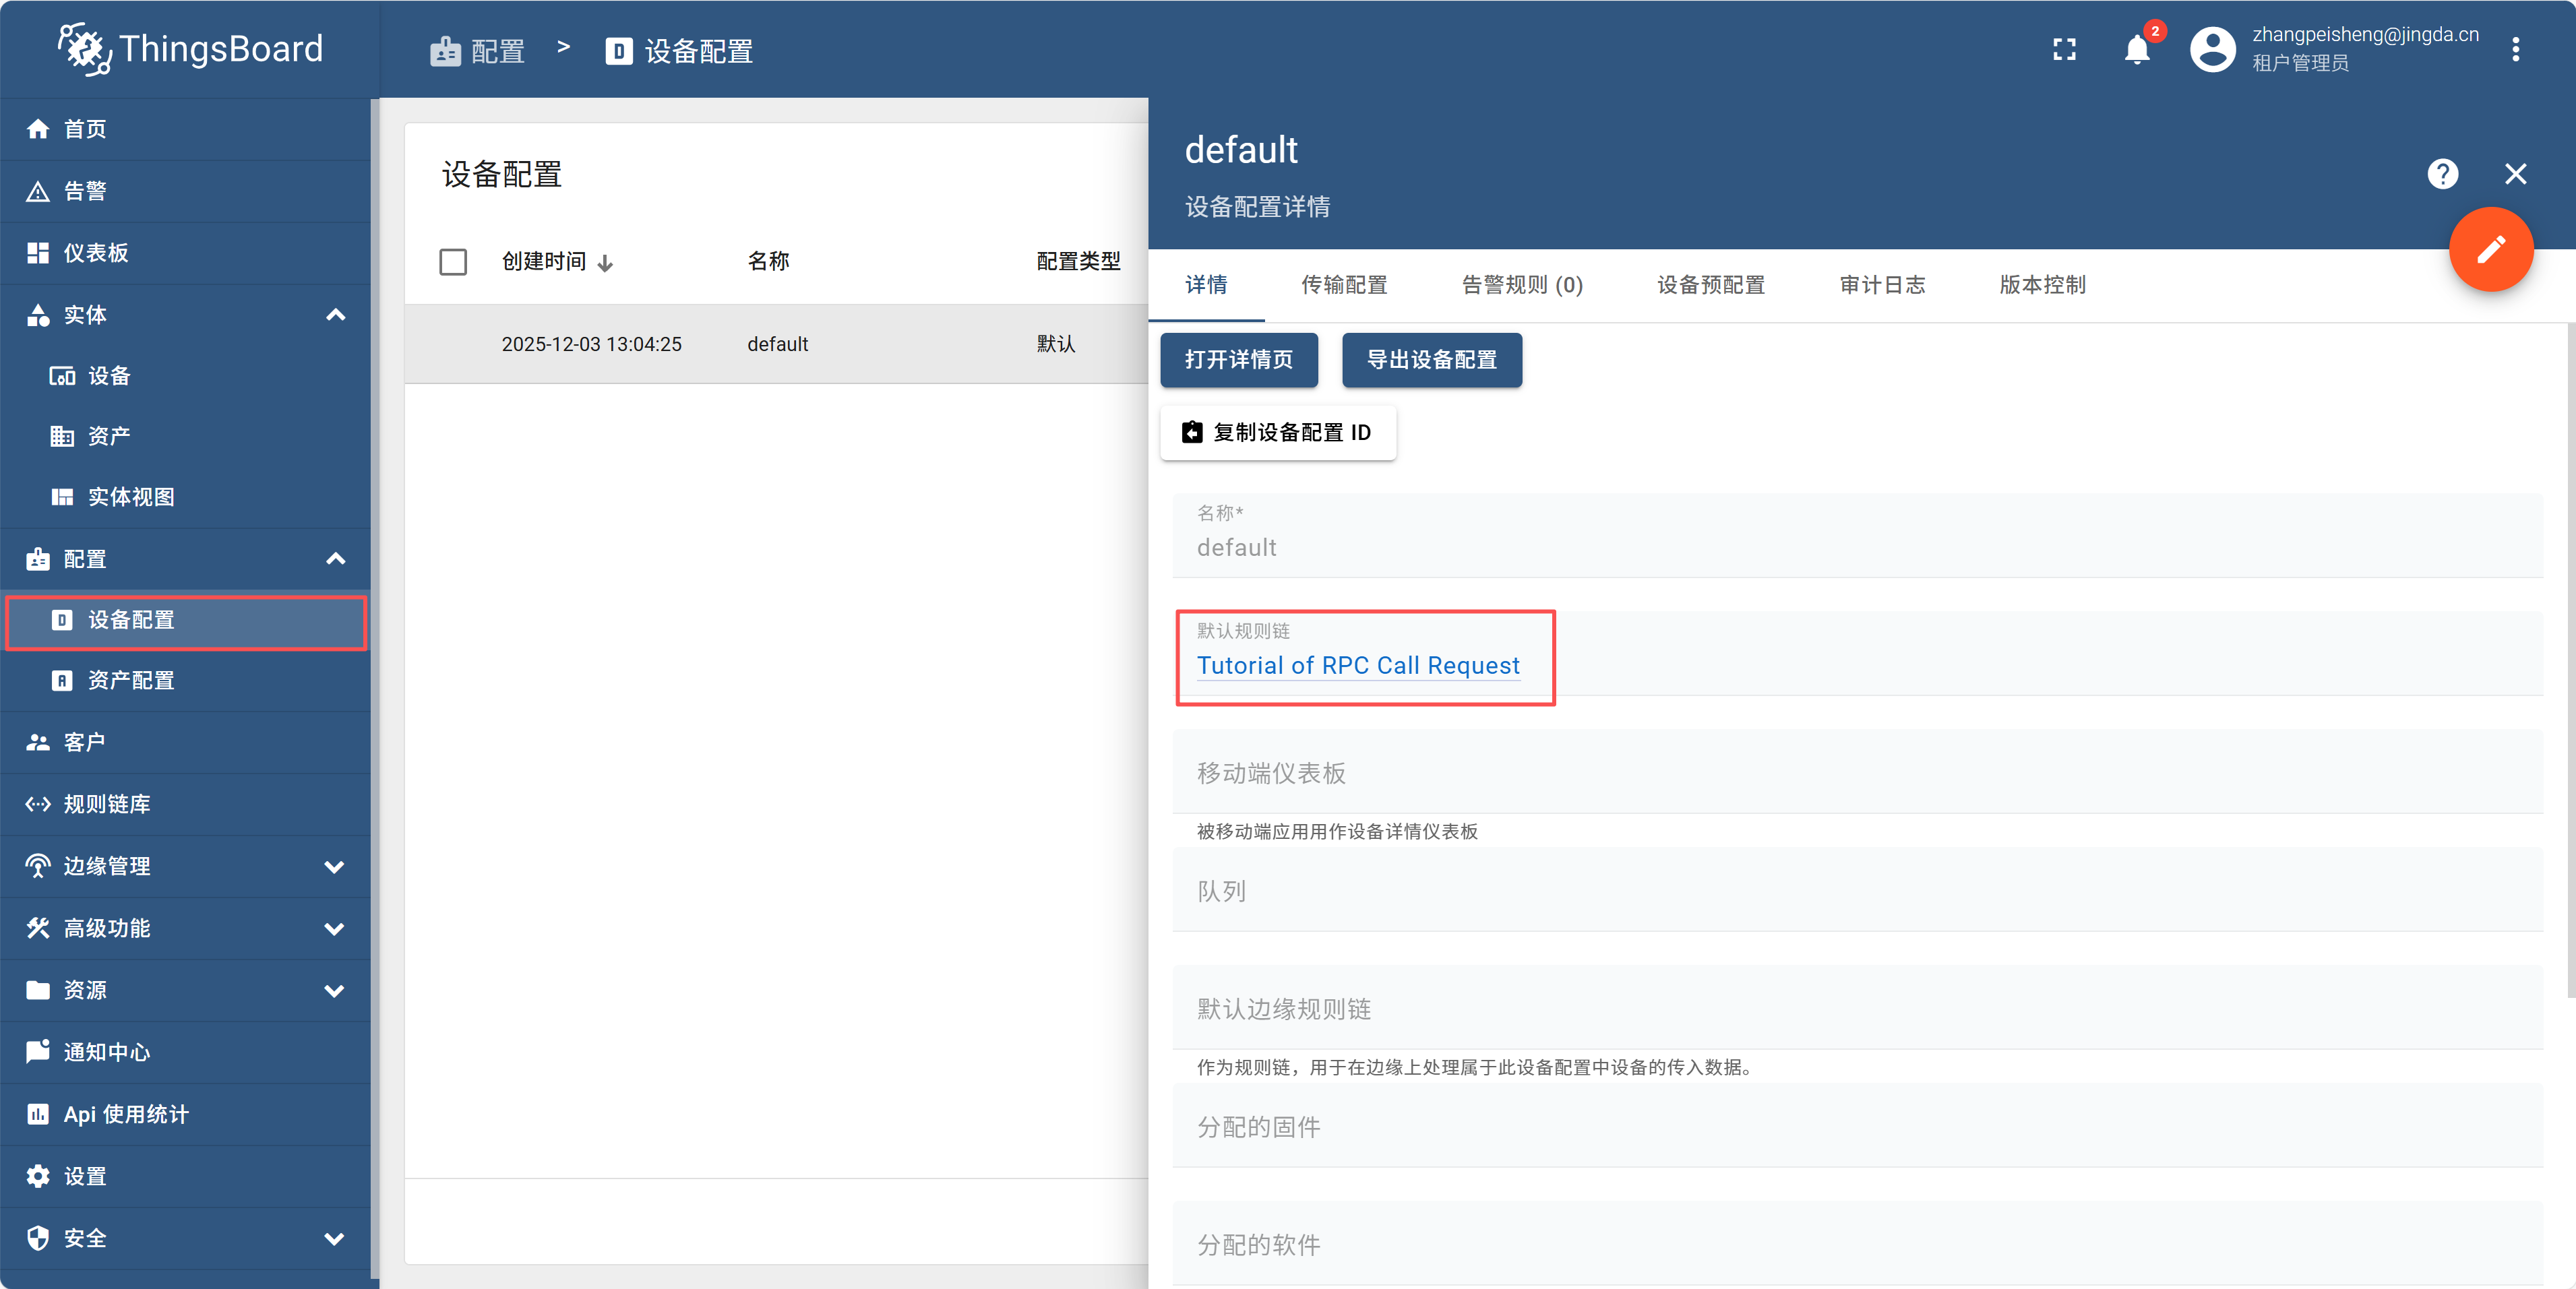
在设备配置里面,打开详情页面,选择默认的规则链为刚才导入的文件。6
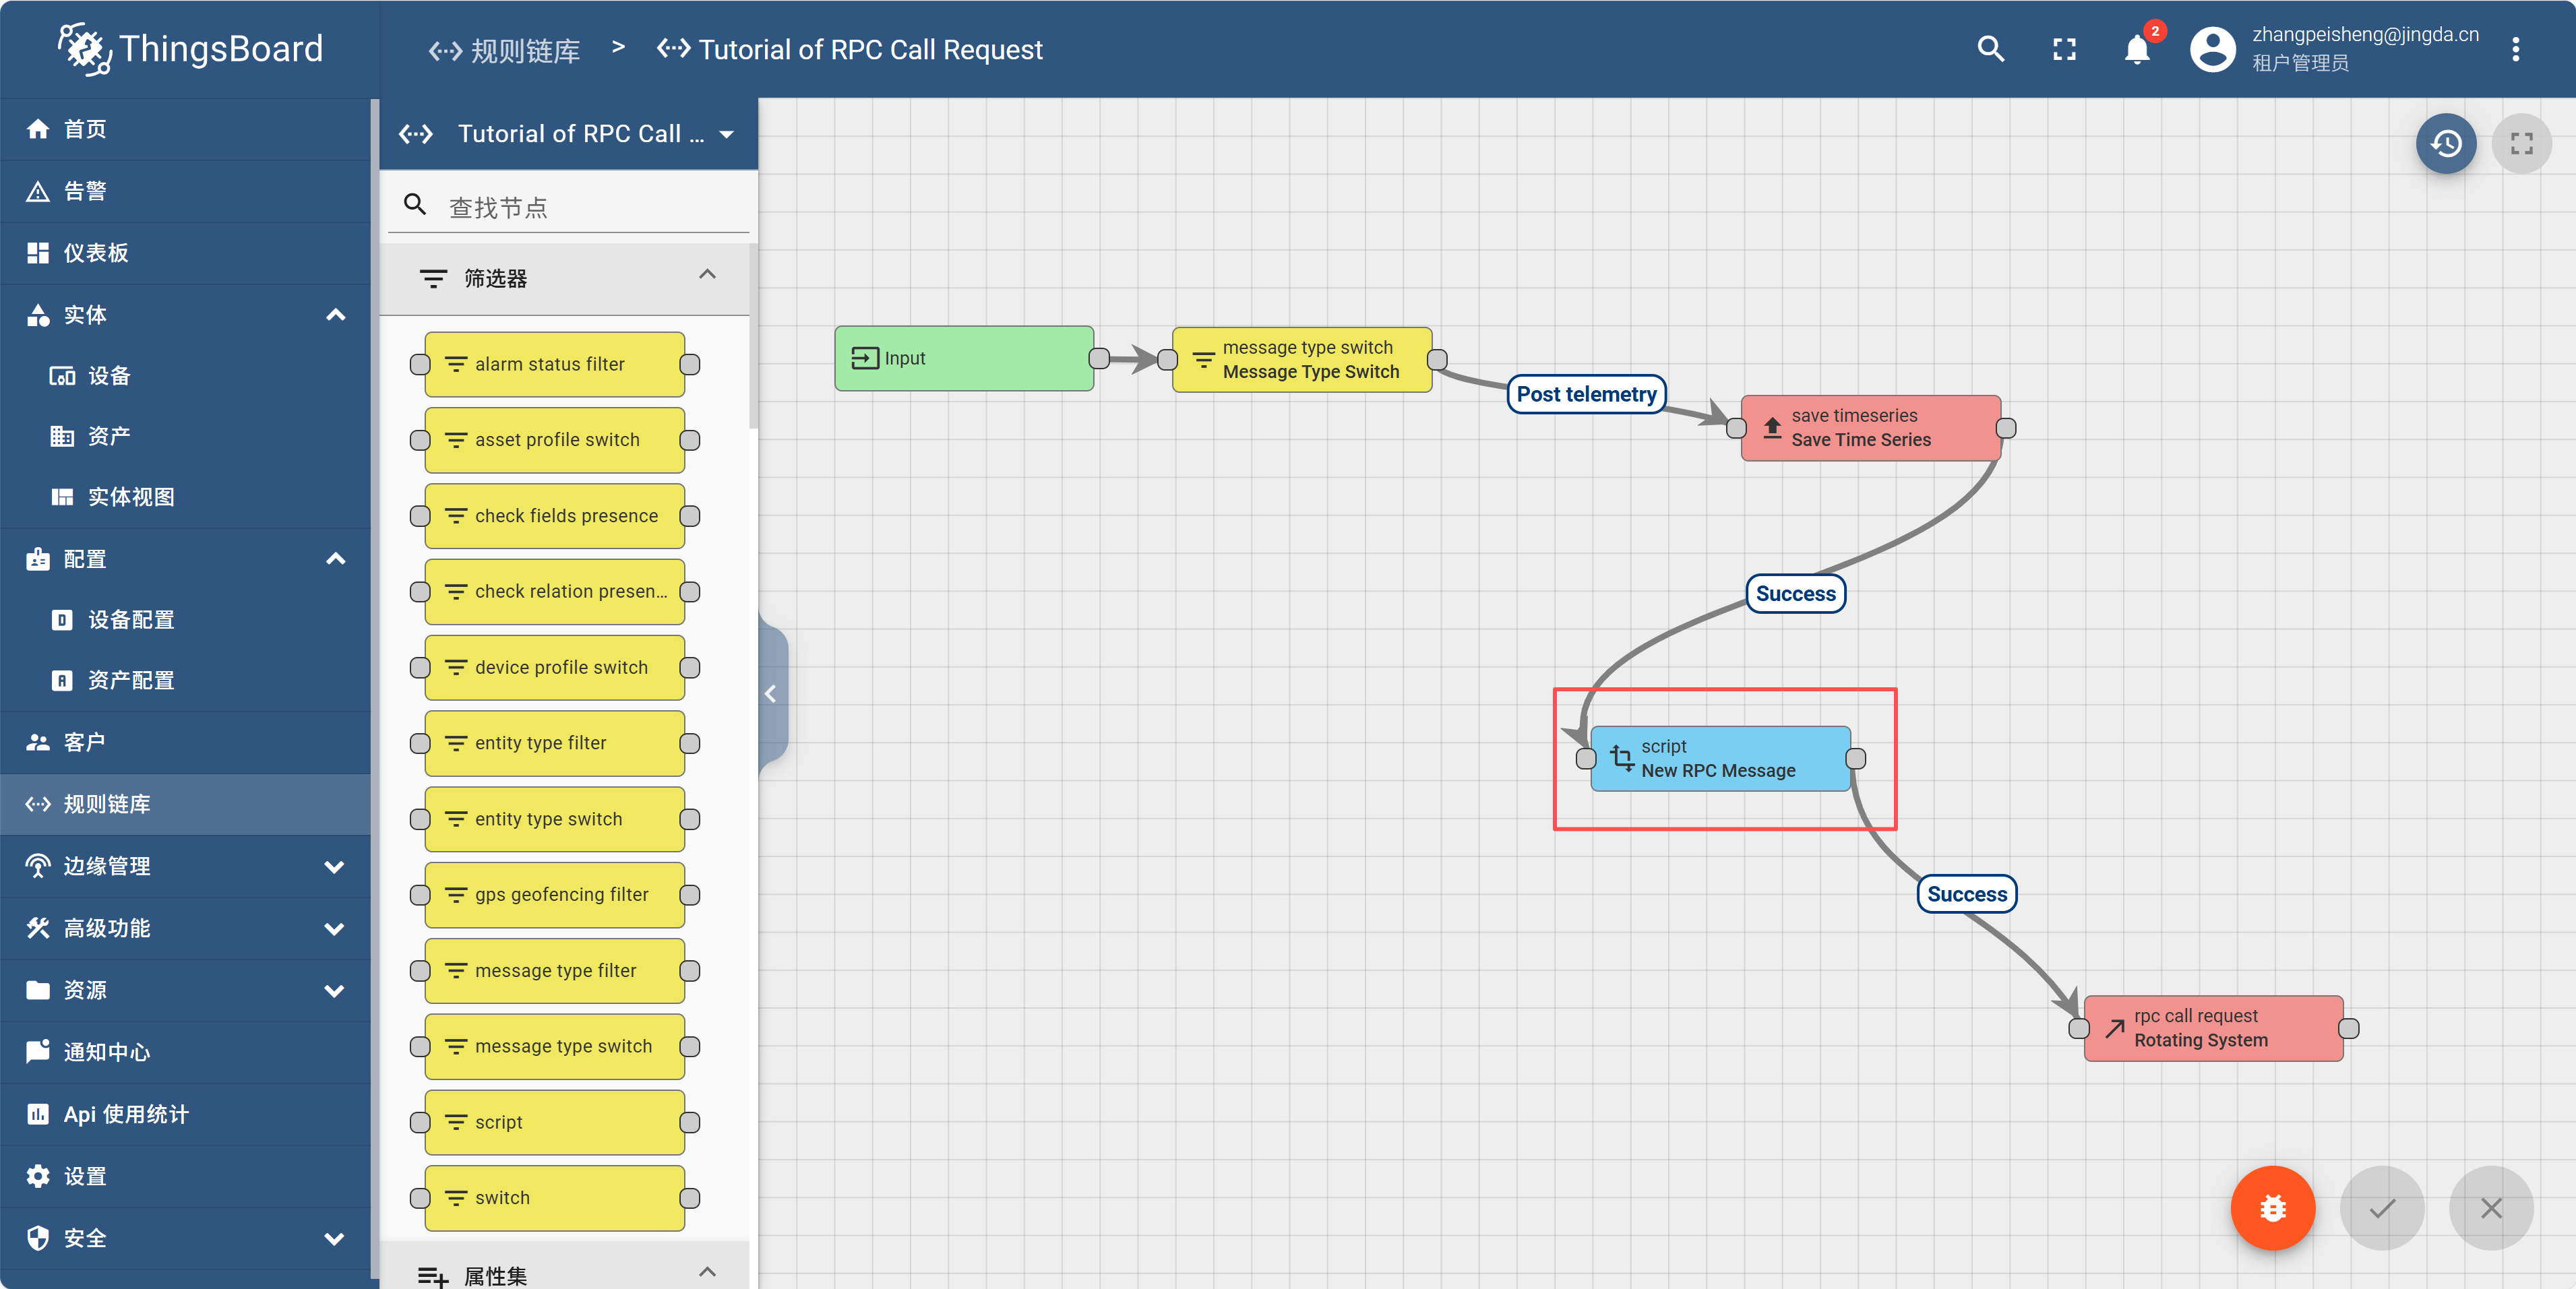
再次打开刚才的规则链,点击下面的节点
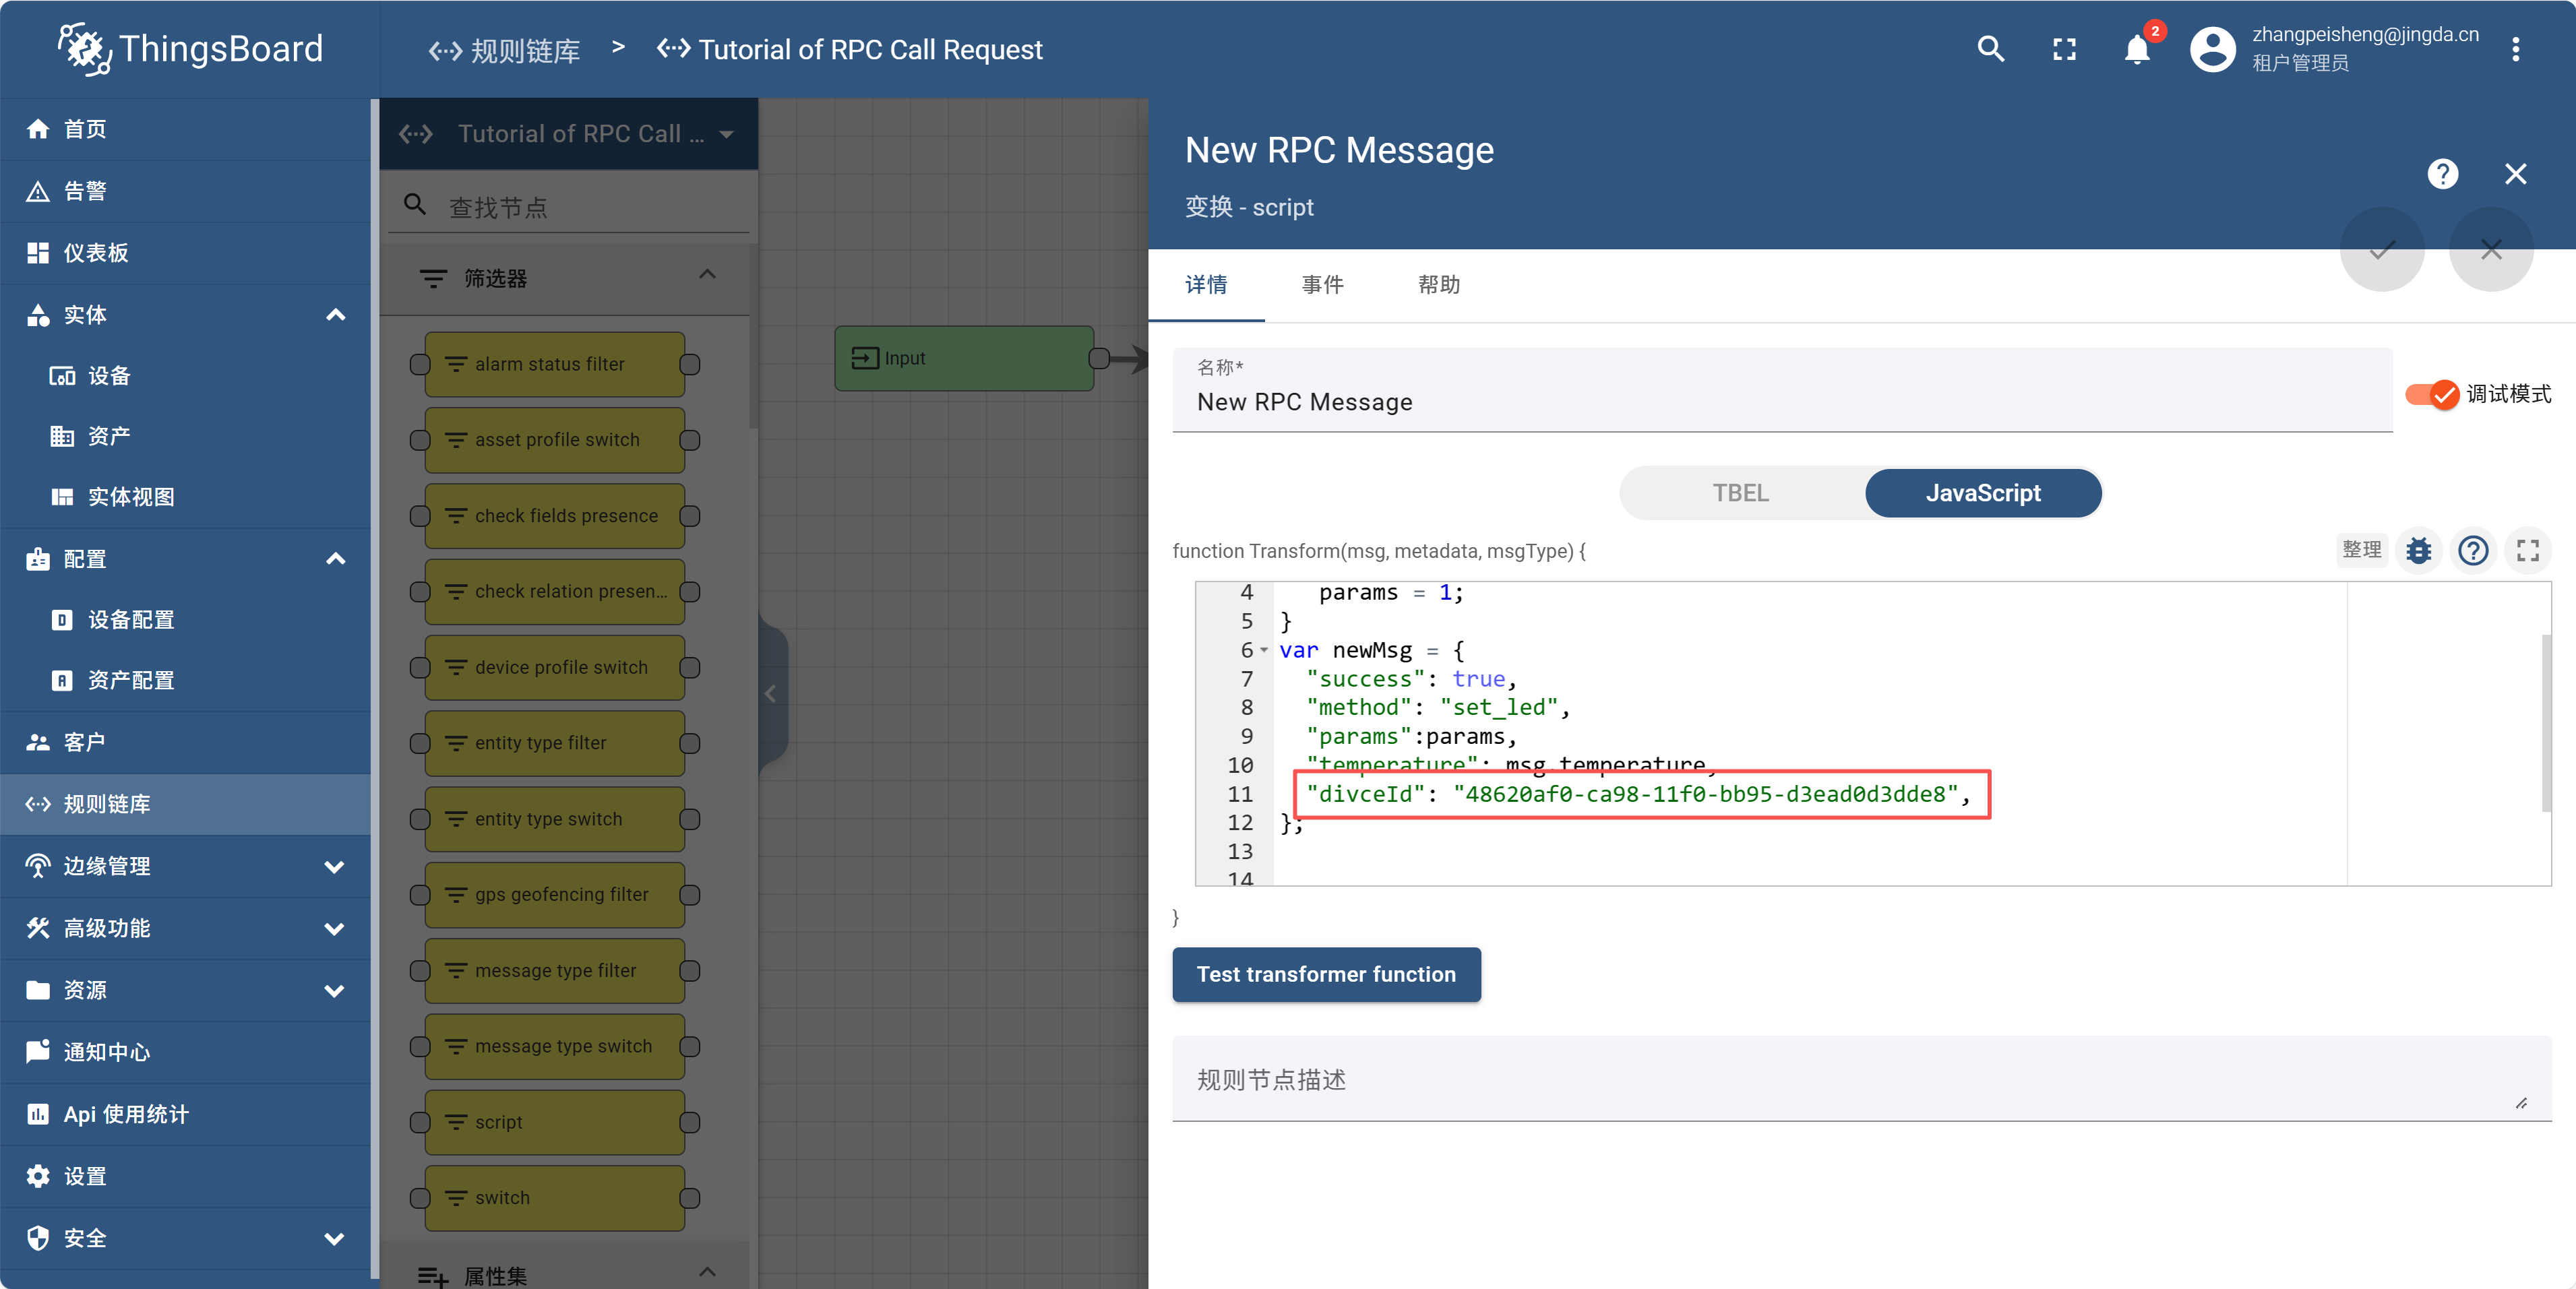
把复制的diviceId替换成你的。
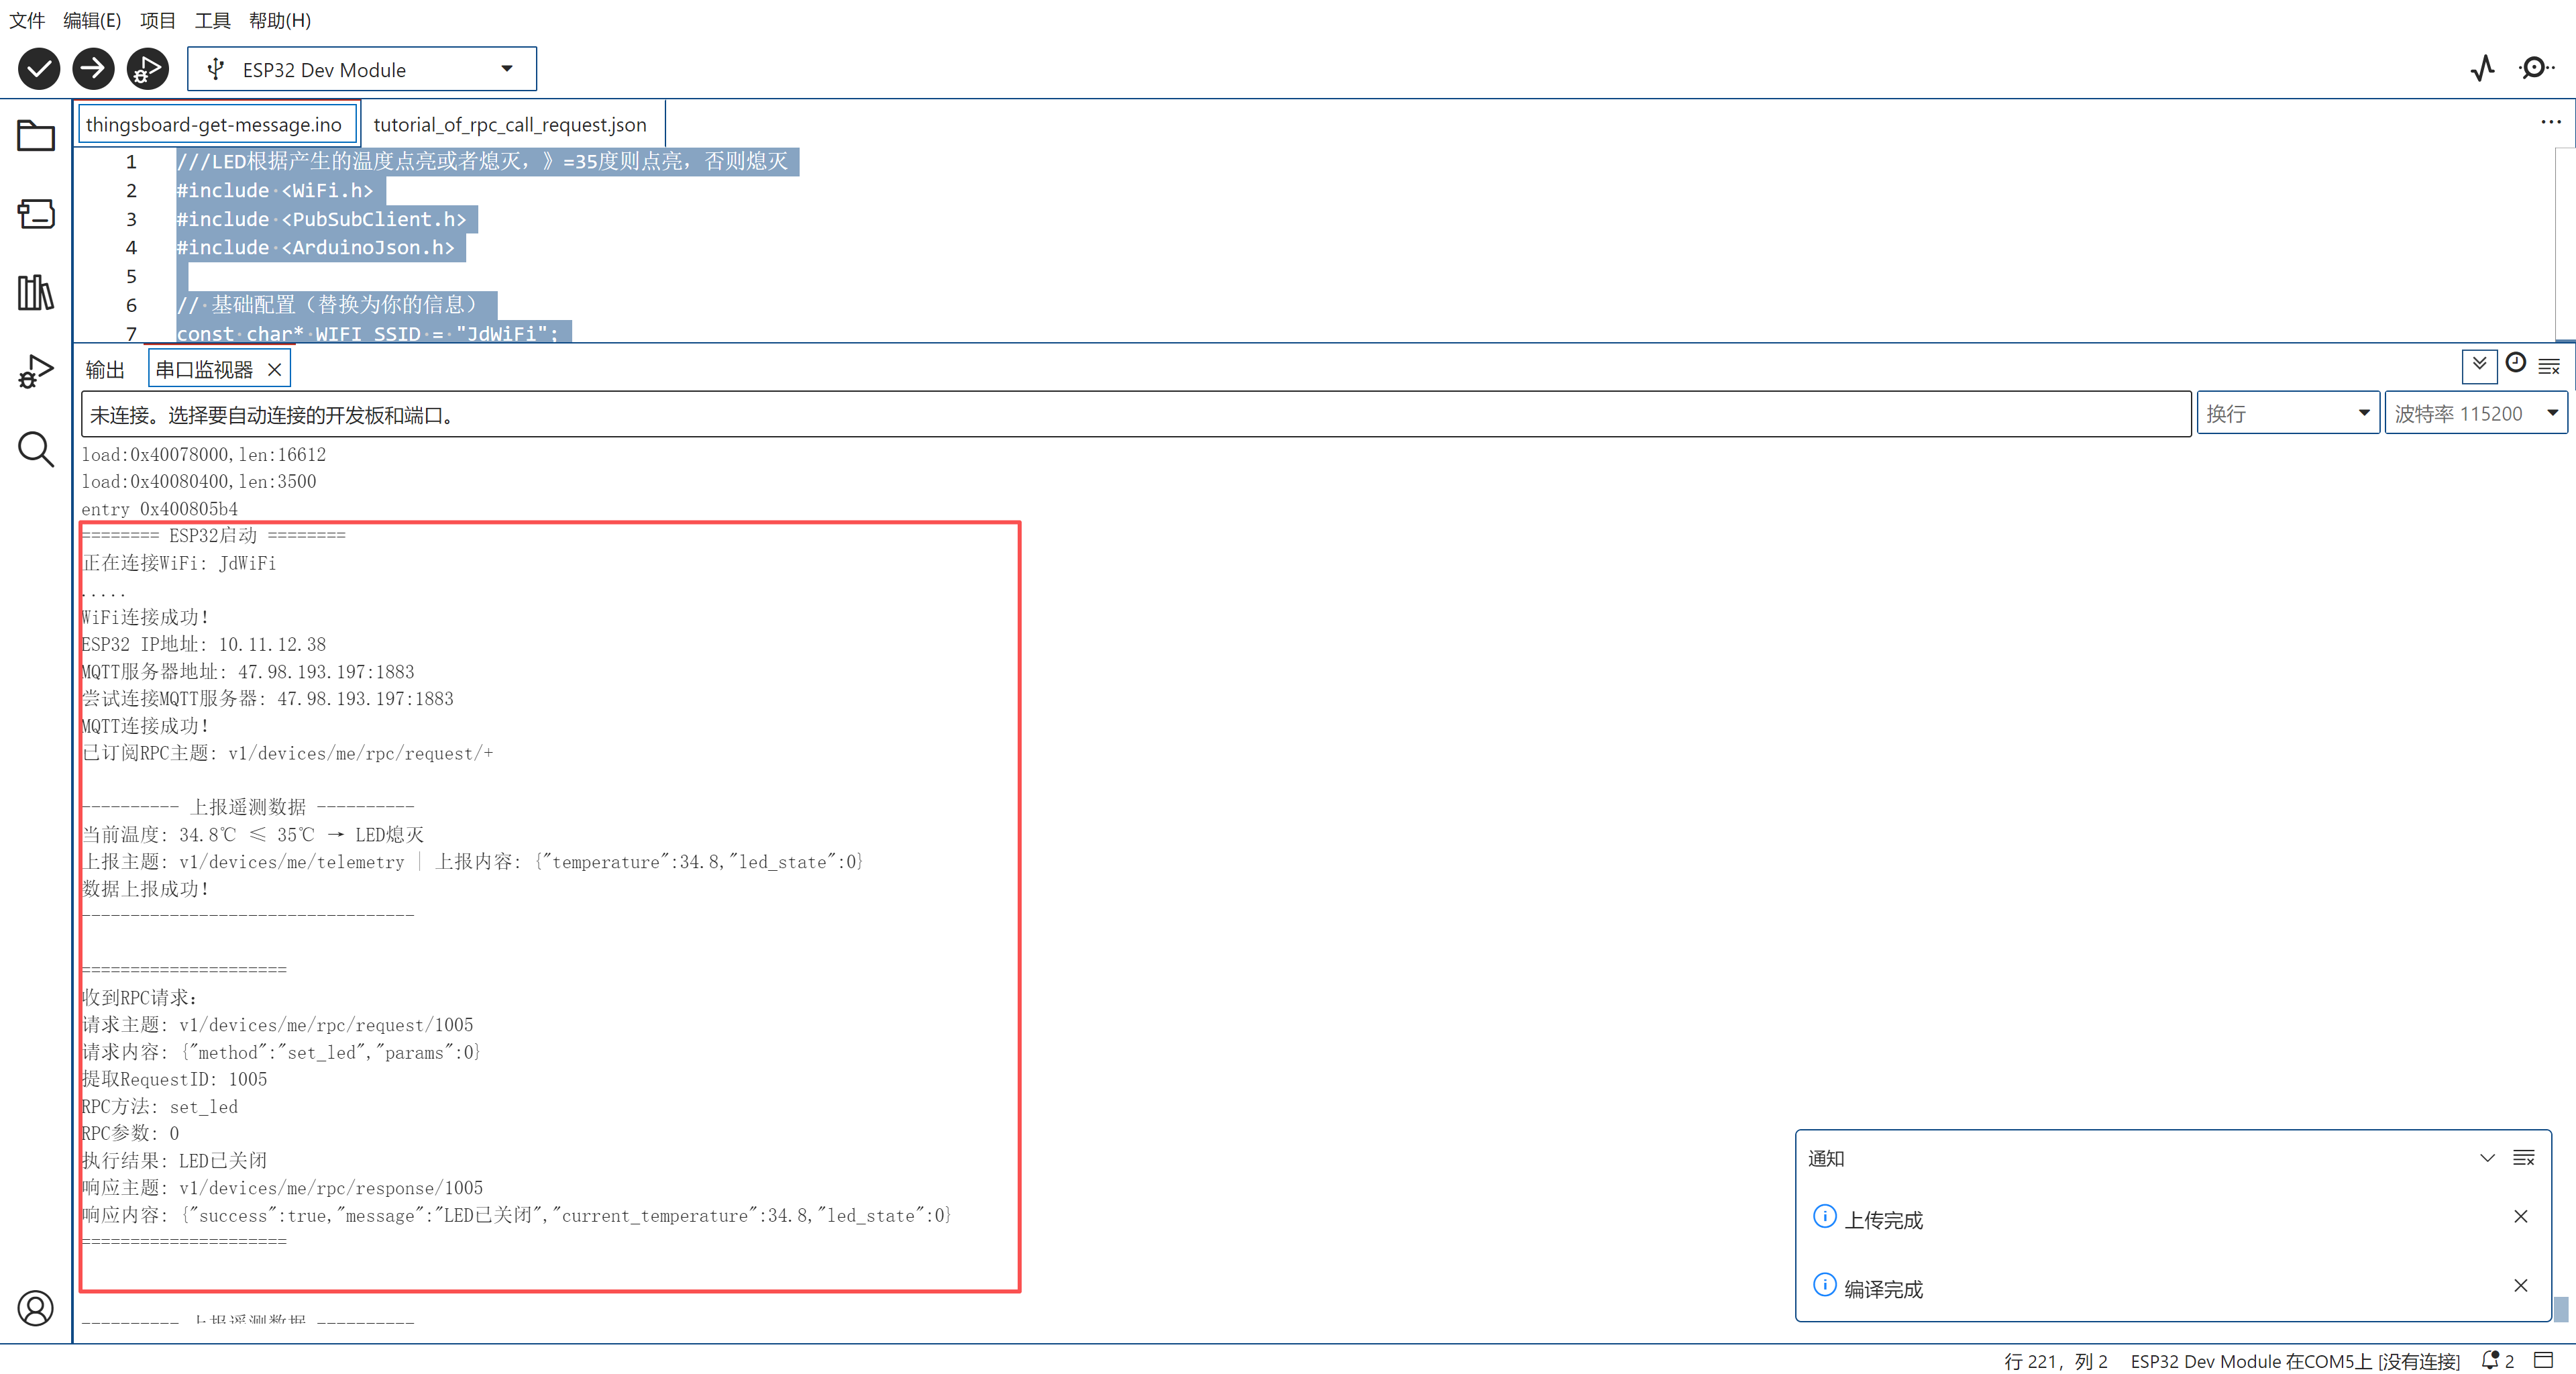
查看Arduino的串口输出信息,和ESP32板块上的LED灯,应该随着发送温度而变化。